
To apply a standard water-transfer temporary tattoo, start with clean, completely dry skin. Remove the clear protective film, place the design face down, and hold it still while you wet the entire backing paper evenly. Check one corner, peel the paper away slowly, and let the tattoo dry before touching it or covering it with clothing.
These instructions are for classic decal-style tattoos, including Beauty of Papers water-transfer sheets. Henna, jagua, and semi-permanent stains use different processes.
What You Need Before You Start
- A standard water-transfer temporary tattoo
- Clean water
- A soft cloth, sponge, or folded paper towel
- Scissors if you are cutting one design from a larger sheet
Do not apply over lotion, body oil, sunscreen, makeup, or sweat. Wash the area if needed, then dry it fully.
Choose the size, direction, and placement first
Before removing the film, check the design’s size, angle, and reading direction. A flatter, lower-friction area is usually easier than a finger, wrist, elbow, or knee.
If you are still deciding where the design should go, use our guide to the best temporary tattoo placements before applying it.
How Do You Apply a Temporary Tattoo Step by Step?
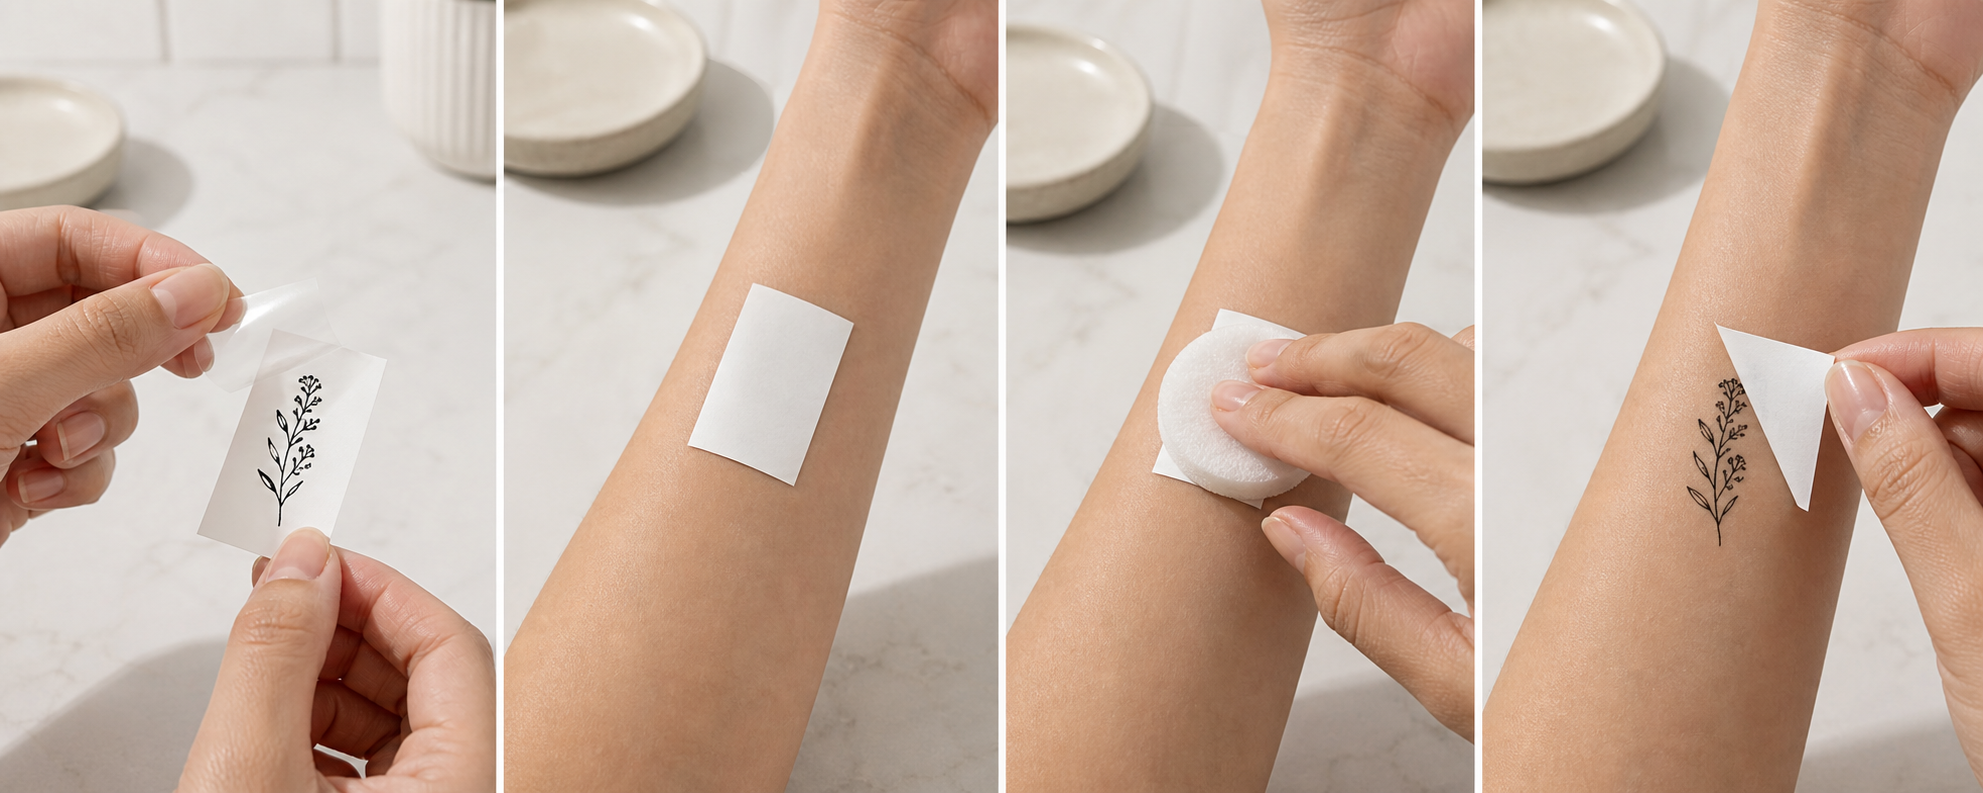
1. Cut out and position the design
If the sheet contains several tattoos, cut out the design you want while leaving a small border around it. Hold it over the intended area and confirm the direction before you expose the transfer surface.
2. Clean and fully dry the skin
Wash away oil, lotion, sunscreen, makeup, and sweat. Dry the area completely. Avoid freshly shaved, sunburned, broken, or already irritated skin.
3. Remove the clear protective film
Peel off the transparent sheet that covers the design. Try not to touch the exposed design more than necessary.
4. Place the design face down
Set the printed side directly against the skin. Once it is in contact, do not slide it around to correct the angle. Movement during transfer can create blurred edges or a faint double image.
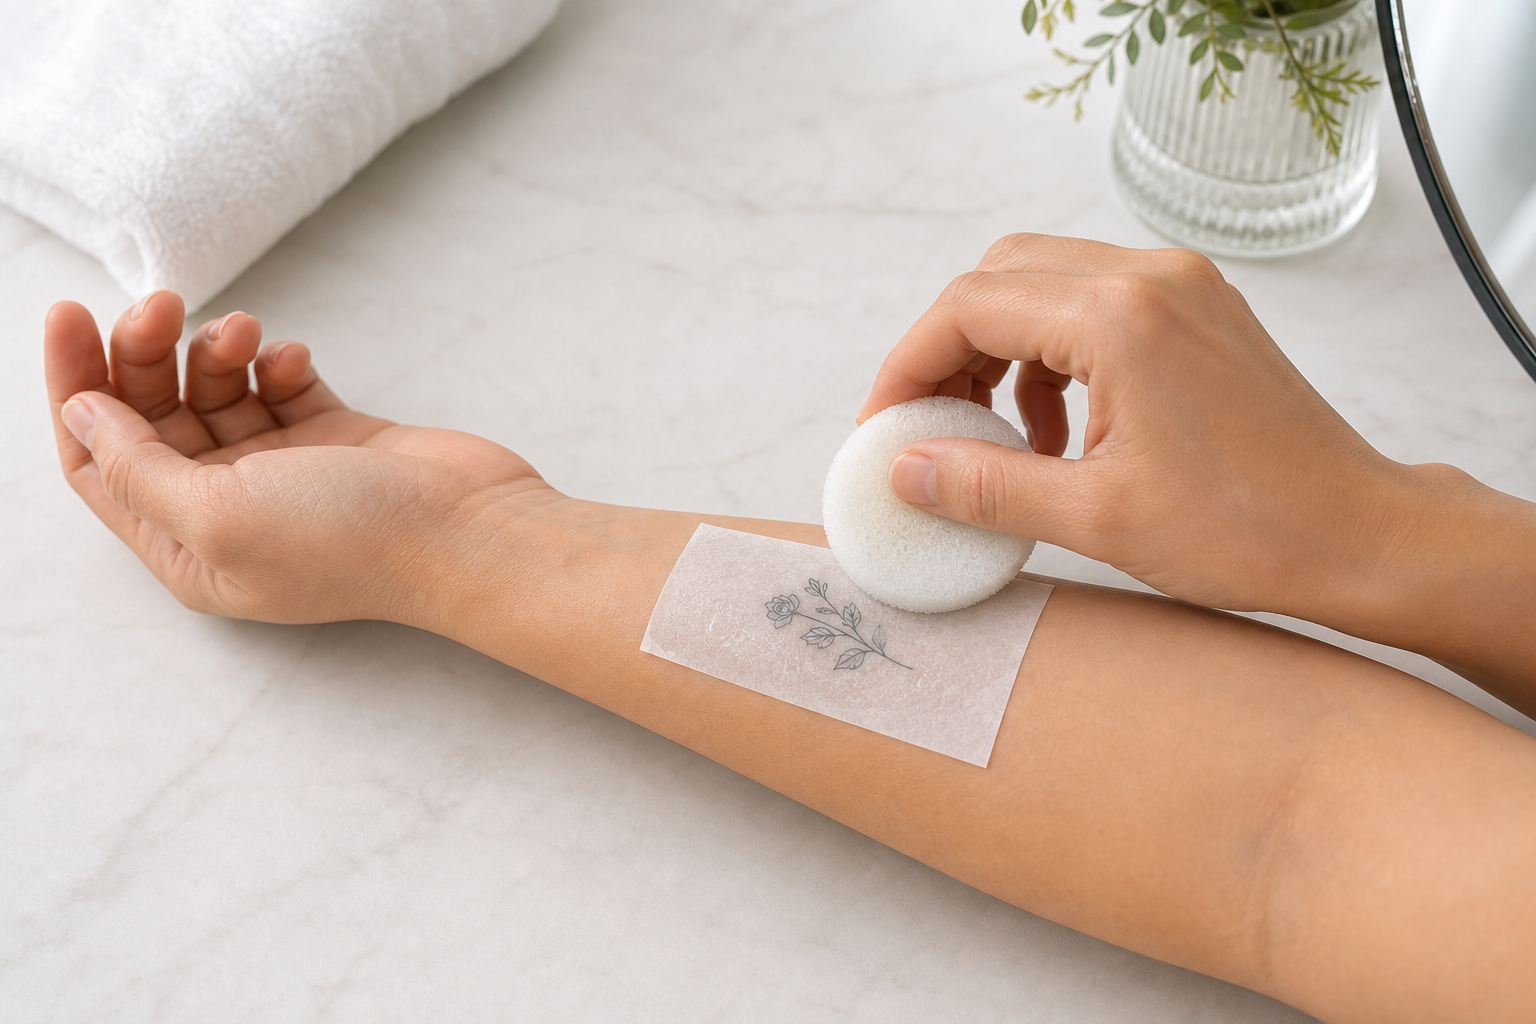
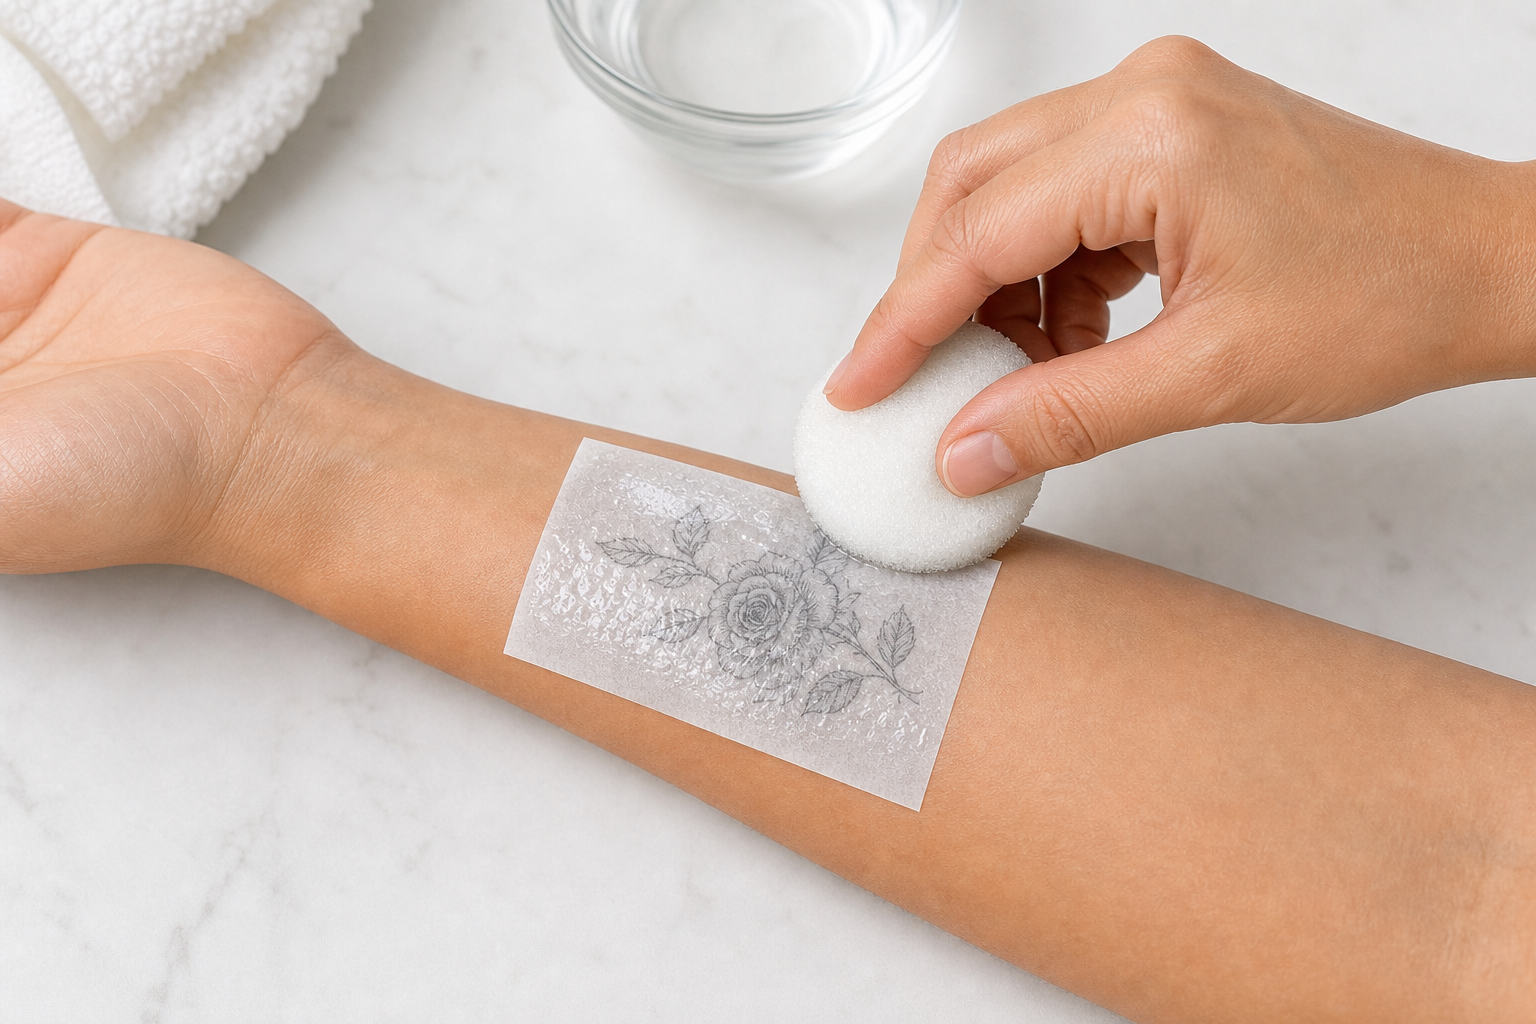
5. Wet the backing paper evenly
Press a wet cloth, sponge, or folded paper towel over the entire backing paper. The aim is even moisture from the center to every edge, not maximum pressure. Keep the tattoo still while the water releases the design from its backing.
For Beauty of Papers standard water-transfer sheets, our practical rule is simple: if one area of the backing still looks or feels dry, add water to that area instead of pressing harder. This is an application guideline for this product type, not a guarantee that every temporary tattoo brand transfers in exactly the same way.
6. Check one corner and peel slowly
Lift one corner gently. If the design is not releasing cleanly, lay it back down and wet the backing a little more. Do not pull forcefully.
7. Let the tattoo dry
Once the paper is removed, leave the tattoo uncovered until the surface is dry. Do not rub it, test the edges, or immediately cover it with tight clothing. A clean transfer needs a short period without friction.
How Long Should You Wet a Temporary Tattoo?
About 25 to 35 seconds is a common starting range for many standard water-transfer tattoos, but the product instructions and the condition of the backing paper matter more than one universal number. The full backing should be evenly wet, including its corners.
If the paper has dry patches or the design stays on the paper, put it back down and add water instead of continuing to peel.
Why Did My Temporary Tattoo Not Transfer Properly?
Only half of the design transferred
The backing may have been unevenly wet or removed too soon. If you notice this at the first corner, put the paper back and add water. After complete removal, a large missing section usually cannot be transferred cleanly again.
The edges look blurry or doubled
The tattoo probably shifted after the design touched the skin. Hold it in place while wetting the backing, and do not slide it to fix the angle.
Why Is My Temporary Tattoo Not Sticking?
A water-transfer tattoo may not stick because the clear protective film was left on, the skin has oil, lotion, sunscreen, makeup, or sweat on it, the backing was not wet evenly, the paper moved, or the placement has too much hair or curve. Clean and dry the skin, then use a fresh tattoo rather than rubbing the failed design.
The design is crooked or facing the wrong way
Do not rotate a wet transfer. If the placement is wrong, remove it gently and start with a fresh tattoo. Our guide to peeling, cracked, and half-transferred tattoos explains when reapplication is cleaner.
What to Do Right After Application
Let the tattoo dry before touching it, dressing over it, exercising, or exposing it to repeated rubbing. Once dry, many standard decals can handle ordinary water contact, but water resistance does not mean rub-proof or oil-proof.
For wear care, see how to make temporary tattoos last longer. If you are planning to shower or swim, read our separate guide to waterproof temporary tattoos.
Sensitive-Skin Application Notes
Temporary tattoo formulas vary. The U.S. Food and Drug Administration reports adverse reactions involving some temporary tattoos, so cautious first use is appropriate.
If your skin is sensitive, use a small design on a small, lower-friction area first. Read the ingredient declaration, avoid known triggers, and do not apply over broken, irritated, sunburned, or freshly shaved skin. Remove the tattoo if you develop redness, itching, swelling, burning, or pain. For fuller guidance, read are temporary tattoos safe?
Temporary Tattoo Instructions FAQ
Can I use a sponge instead of a wet cloth?
Yes. A sponge, soft cloth, or folded wet paper towel can work. The tool matters less than keeping the backing paper evenly wet without moving the tattoo.
How Do You Apply Temporary Face Tattoos?
Apply a small face temporary tattoo to clean, dry, bare skin using the same water-transfer method as a body tattoo. Choose a flat cheek or temple area, hold the backing still while wetting it evenly, lift it slowly, and let the design dry before adding compatible makeup around it. Keep the transfer and remover away from eyelids, the waterline, lips, broken skin, and the immediate eye area.
Can I apply a temporary tattoo over makeup?
Standard water-transfer tattoos usually work more reliably on clean, dry skin than over foundation or oily makeup. If the tattoo is part of a face look, apply it to bare skin first and build compatible makeup around it. See our guide to temporary tattoos and makeup for the detailed order of application.
What should I do if the transfer is patchy?
If the backing is still partly attached, lay it back down and wet the dry area. If the backing is already off and a large section is missing, gentle removal and a fresh application usually give a cleaner result than trying to patch it.
Choose a Design That Fits the Placement
Small designs with clear edges are often easier for first-time application; larger designs need more planning and even wetting. For event styling, browse festival temporary tattoos; for makeup placement, compare face temporary tattoos; and for jewelry-inspired finishes, shop temporary metallic tattoos. If you want a broader starting point, browse all temporary tattoos.
Final Takeaway
A clean temporary tattoo transfer depends on four things: dry skin, correct direction, even moisture, and no movement. Prepare the placement before removing the protective film, wet every part of the backing, check one corner before peeling, and let the finished tattoo dry without friction. If the transfer resists, add water instead of force.